Deprecation Notice
This project is no longer being maintained. All the contents have been
moved to magpie.
Monkey Programming Language
Chinese version: 中文
Table of Contents
Summary
Monkey is a toy language interpreter, written in Go. It has C-style syntax, and is largely inspired by Ruby, Python, Perl and c#
It support the normal control flow, functional programming and object oriented programming.
It also has a REPL with realtime syntax highlighter.
This is a sample program using monkey language:
//Declare annotation class
//Note: In the body, you must use property, not method.
class @MinMaxValidator {
  property MinLength
  property MaxLength default 10 //Same as 'property MaxLength = 10'
}

//This is a marker annotation
class @NoSpaceValidator {}

class @DepartmentValidator {
  property Department
}

//The 'Request' class
class Request {
  @MinMaxValidator(MinLength=1)
  property FirstName; //getter and setter are implicit. It is equal to 'property FirstName { get; set; }'

  @NoSpaceValidator
  property LastName;

  @DepartmentValidator(Department=["Department of Education", "Department of Labors"])
  property Dept;
}

//This class is responsible for processing the annotation.
class RequestHandler {
  static fn handle(o) {
    props = o.getProperties()
    for p in props {
      annos = p.getAnnotations()
      for anno in annos {
        if anno.instanceOf(MinMaxValidator) {
          //p.value is the property real value.
          if len(p.value) > anno.MaxLength || len(p.value) < anno.MinLength {
            printf("Property '%s' is not valid!\n", p.name)
          }
        } elseif anno.instanceOf(NoSpaceValidator) {
          for c in p.value {
            if c == " " || c == "\t" {
              printf("Property '%s' is not valid!\n", p.name)
              break
            }
          }
        } elseif anno.instanceOf(DepartmentValidator) {
          found = false
          for d in anno.Department {
            if p.value == d {
              found = true
            }
          }
          if !found {
            printf("Property '%s' is not valid!\n", p.name)
          }
        }
      }
    }
  }
}

class RequestMain {
  static fn main() {
    request = new Request()
    request.FirstName = "Haifeng123456789"
    request.LastName = "Huang     "
    request.Dept = "Department of Labors"
    RequestHandler.handle(request)
  }
}

RequestMain.main()
Below is the result:
Property 'FirstName' not valid!
Property 'LastName' not valid!
Below is the REPL with real time syntax highlight:
Below is the html document generated using the mdoc tool:
Overview
This project is based on mayoms’s project monkey with some bug fixes and a lot of new features including:
- Added simple class support(Indexer, operator overloading, property, static method/property/field and class annotation)
- Modified string module(which can correctly handle utf8 character encoding)
- Added
file module(with some new methods).
- Added
math,time, sort, os, log, net, http, filepath, fmt, sync, list, csv, regexp, template, etc…
sql(db) module(which can correctly handing null values)flag module(for handling command line options)json module(for json marshaling and unmarshaling)linq module(Code come from linq with some modifications)decimal module(Code come from decimal with some minor modifications)- Regular expression literal support(partially like perls)
- channel support(like golang’s channel)
-
| more operator support(&&, |
|
, &, |
, ^, +=, -=, ?:, ??, etc.) |
- utf8 support(e.g. you could use utf8 character as variable name)
- more flow control support(e.g. try/catch/finally, for-in, case, c-like for loop)
- defer support
- spawn support(goroutine)
- enum support
using support(like C#’s using)- pipe operator support(see demo for help)
- function with default value and variadic parameters
- list comprehension and hash comprehension support
- user defined operator support
- Using method of Go Package(
RegisterFunctions and RegisterVars)
There are a number of tasks to complete, as well as a number of bugs. The purpose of this project was to dive deeper into Go, as well as get a better understanding of how programming languages work. It has been successful in those goals. There may or may not be continued work - I do plan on untangling a few messy spots, and there are a few features I’d like to see implemented. This will happen as time and interest allows.
Installation
Just download the repository and run ./run.sh
Basic use
To access the REPL, simply run the following:
~ » monkey
Monkey programming language REPL

>>
or, to run a program:
Language Tour
Monkey support two kinds of single line comment and also block comment.
// this is a single line comment
# this is another single line comment

/* This is a
   block comment.
*/
Data Types
Monkey supports 9 basic data types: String, Int, UInt, Float, Bool, Array, Hash, Tuple and Nil
s1 = "hello, 黄"       # strings are UTF-8 encoded
s2 = `hello, "world"`  # raw string
i = 10                 # int
u = 10u                # uint
f = 10.0               # float
b = true               # bool
a = [1, "2"]           # array
h = {"a": 1, "b": 2}   # hash
t = (1,2,3)            # tuple
n = nil
Constants(Literal)
In monkey, there are mainly eleven types of constants(Literals).
- Integer
- UInteger
- Float
- String
- Regular expression
- Array
- Hash
- Tuple
- Nil
- Boolean
- Function
// Integer literals
i1 = 10
i2 = 20_000_000     //for more readable
i3 = 0x80           // hex
i4 = 0b10101        // binary
i5 = 0o127          // octal

// Unsigned Integer literals
ui1 = 10u
ui2 = 20_000_000u     //for more readable
ui3 = 0x80u           // hex
ui4 = 0b10101u        // binary
ui5 = 0o127u          // octal

// Float literals
f1 = 10.25
f2 = 1.02E3
f3 = 123_456.789_012 //for more readable

// String literals
s1 = "123"
s2 = "Hello world"

// Regular expression literals
r = /\d+/.match("12")
if (r) { prinln("regex matched!") }

// Array literals
a = [1+2, 3, 4, "5", 3]

// Hash literals
h = { "a": 1, "b": 2, "c": 2}

//Tuple literals
t = (1, 2+3, "Hello", 5)

// Nil literal
n = nil

// Boolean literals
t = true
f = false

// Function literals
let f1 = add(x, y) { return x + y }
println(f1(1,2))

//fat-arrow function literals
let f2 = (x, y) => x + y
println(f2(1,2))
Variables
Variables in Monkey could start with the keyword let, or nothing with the
form variable=value.
let a, b, c = 1, "hello world", [1,2,3]
d = 4
e = 5
姓 = "黄"
You can also use Destructuring assignment.
Note, the left-hand side must be included using the ‘()’.
//righ-hand side is an array
let (d,e,f) = [1,5,8]
//d=1, e=5, f=8

//right-hand side is a tuple
let (g, h, i) = (10, 20, "hhf")
//g=10, h=20, i=hhf

//righ-hand side is a hash
let (j, k, l) = {"j": 50, "l": "good"}
//j=50, k=nil, l=good
Note however, if you do not use the keyword let, you could not do multiple variable assignments.
Below code is not correct:
//Error, multiple variable assignments must be use `let` keyword
a, b, c = 1, "hello world", [1,2,3]
Note:Starting from Monkey 5.0,when the decalared variable already exists, it’s value will be overwritten:
let x, y = 10, 20;
let x, y = y, x //Swap the value of x and y
printf("x=%v, y=%v\n", x, y)  //result: x=20, y=10
let also support the placeholder(_), when assigned a value, it will just ignore it.
let x, _, y = 10, 20, 30
printf("x=%d, y=%d\n", x, y) //result: x=10, y=30
Reserved keywords
Keywords are predefined, reserved identifiers that have special meanings to the compiler. They cannot be used as identifiers. Below is a list of reserved keywords
- fn
- let
- true false nil
- if elsif elseif elif else
- unless
- return
- include
- and or
- enum
- struct # reserved, not used
- do while for break continue where
- grep map
- case is in
- try catch finally throw
- defer
- spawn
- qw
- using
- class new property set get static default
- interface public private protected # reserved, not used
Type conversion
You can use the builtin int(), uint(), float(), str(), array(), tuple(), hash, decimal functions for type conversion.
let i = 0xa
let u = uint(i)                 // result: 10
let s = str(i)                  // result: "10"
let f = float(i)                // result: 10
let a = array(i)                // result: [10]
let t = tuple(i)                // result:(10,)
let h = hash(("key", "value"))  // result: {"key": "value}
let d = decimal("123.45634567") // result: 123.45634567
You could create a tuple from an array:
let t = tuple([10, 20]) //result:(10,20)
Similarly, you could also create an array from a tuple:
let arr = array((10,20)) //result:[10,20]
You could only create a hash from an array or a tuple:
//create an empty hash
let h1 = hash()  //same as h1 = {}

//create a hash from an array
let h1 = hash([10, 20])     //result: {10 : 20}
let h2 = hash([10,20,30])   //result: {10 : 20, 30 : nil}

//create a hash from a tuple
let h3 = hash((10, 20))     //result: {10 : 20}
let h4 = hash((10,20,30))   //result: {10 : 20, 30 : nil}
qw(Quote word) keyword
The qw keyword is like perl’s qw keyword. When you want to use a lot of quoted strings,
the qw keyword can make it a lot easier for those strings.
for str in qw<abc, def, ghi, jkl, mno> { //allowed 'qw' pair is '{}', '<>', '()'
  println('str={str}')
}

newArr = qw(1,2,3.5) //array with string values, not number values.
fmt.printf("newArr=%v\n", newArr)
enum keyword
In mokey, you can use enum to define constants.
LogOption = enum {
    Ldate         = 1 << 0,
    Ltime         = 1 << 1,
    Lmicroseconds = 1 << 2,
    Llongfile     = 1 << 3,
    Lshortfile    = 1 << 4,
    LUTC          = 1 << 5,
    LstdFlags     = 1 << 4 | 1 << 5
}

opt = LogOption.LstdFlags
println(opt)

//get all names of the `enum`
for s in LogOption.getNames() { //not ordered
    println(s)
}

//get all values of the `enum`
for s in LogOption.getValues() { //not ordered
    println(s)
}

// get a specific name of the `enum`
println(LogOption.getName(LogOption.Lshortfile))
Monkey has some meta-operators borrowed from perl6.
There are strict rules for meta-operators:
- Meta-operators can only operator on arrays.
- Each array’s element must be number type(uint, int, float) or string type.
- If the meat-operators serve as an infix operator, and if the left and right are all arrays, they must have the same number of elements.
let arr1 = [1,2,3] ~* [4,5,6]
let arr2 = [1,2,3] ~* 4
let arr3 = [1,2,"HELLO"] ~* 2
let value1 = ~*[10,2,2]
let value2 = ~+[2,"HELLO",2]

println(arr1)   //result: [4, 10, 18]
println(arr2)   //result: [4, 8, 12]
println(arr3)   //result: [2,4,"HELLOHELLO"]
println(value1) //result: 40
println(value2) //result: 2HELLO2
At the moment, Monkey has six meta-operators:
The six meta-operators could be served as either infix expression or prefix expression.
The meta-operator for infix expression will return an array.
The meta-operator for prefix expression will return a value(uint, int, float, string).
Below talbe give an example of meta-operator and their meanings:(only ~+ is showed):
| Meta-Operator</td>
| Expression</td>
| Example</td>
| Result</td>
</tr>
|
| ~+ |
Infix Expression |
[x1, y1, z1] ~+ [x2, y2, z2] |
[x1+x2, y1+y2, z1+z2] (Array) |
| ~+ |
Infix Expression |
[x1, y1, z1] ~+ 4 |
[x1+4, y1+4, z1+4] (Array) |
| ~+ |
Prefix Expression |
~+[x1, y1, z1] |
x1+y1+z1 (Note: a value, not an array) |
</table>
### Control flow
* if/if-else/if-elif-else/if-elsif-else/if-elseif-else/if-else if-else
* unless/unless-else
* for/for-in
* while
* do
* try-catch-finally
* case-in/case-is
```swift
// if-else
let a, b = 10, 5
if (a > b) {
println("a > b")
}
elseif a == b { // could also use 'elsif', 'elseif' or 'elif'
println("a = b")
}
else {
println("a < b")
}
//unless-else
unless b > a {
println("a >= b")
} else {
println("b > a")
}
// for
i = 9
for { // forever loop
i = i + 2
if (i > 20) { break }
println('i = {i}')
}
i = 0
for (i = 0; i < 5; i++) { // c-like for, '()' is a must
if (i > 4) { break }
if (i == 2) { continue }
println('i is {i}')
}
i = 0
for (; i < 5; i++) { // no initialization statement.
if (i > 4) { break }
if (i == 2) { continue }
println('i is {i}')
}
i = 0
for (; i < 5;;) { // no updater statement.
if (i > 4) { break }
if (i == 2) { continue }
println('i is {i}')
i++ // Updater statement
}
i = 0
for (;;;) { // same as 'for { block }'
if (i > 4) { break }
println('i is {i}')
i++ //update the 'i'
}
for i in range(10) {
println('i = {i}')
}
a = [1,2,3,4]
for i in a where i % 2 != 0 {
println(i)
}
hs = {"a": 1, "b": 2, "c": 3, "d": 4, "e": 5, "f": 6, "g": 7}
for k, v in hs where v % 2 == 0 {
println('{k} : {v}')
}
for i in 1..5 {
println('i={i}')
}
for item in 10..20 where $_ % 2 == 0 { // $_ is the index
printf("idx=%d, item=%d\n", $_, item)
}
for c in "m".."a" {
println('c={c}')
}
for idx, v in "abcd" {
printf("idx=%d, v=%s\n", idx, v)
}
for idx, v in ["a", "b", "c", "d"] {
printf("idx=%d, v=%s\n", idx, v)
}
for item in ["a", "b", "c", "d"] where $_ % 2 == 0 { // $_ is the index
printf("idx=%d, item=%s\n", $_, v)
}
//for loop is an expression, not statement, so it could be assigned to a variable
let plus_one = for i in [1,2,3,4] { i + 1 }
fmt.println(plus_one)
// while
i = 10
while (i>3) {
i--
println('i={i}')
}
// do
i = 10
do {
i--
if (i==3) { break }
}
// try-catch-finally(only support string type)
let exceptStr = "SUMERROR"
try {
let th = 1 + 2
if (th == 3) { throw exceptStr }
}
catch "OTHERERROR" {
println("Catched OTHERERROR")
}
catch exceptStr {
println("Catched is SUMERROR")
}
catch {
println("Catched ALL")
}
finally {
println("finally running")
}
// case-in/case-is
let testStr = "123"
case testStr in { // in(exact/partial match), is(only exact match)
"abc", "mno" { println("testStr is 'abc' or 'mno'") }
"def" { println("testStr is 'def'") }
`\d+` { println("testStr contains digit") }
else { println("testStr not matched") }
}
let i = [{"a": 1, "b": 2}, 10]
let x = [{"a": 1, "b": 2},10]
case i in {
1, 2 { println("i matched 1, 2") }
3 { println("i matched 3") }
x { println("i matched x") }
else { println("i not matched anything")}
}
```
### using statement
In monkey, if you have some resources you want to release/free/close, e.g. close opended file, close network connection etc,
you can use the `using` statement just like `c#`.
```swift
// Here we use 'using' statement, so we do not need to call infile.close().
// When finished running 'using' statement, it will automatically call infile.close().
using (infile = newFile("./file.demo", "r")) {
if (infile == nil) {
println("opening 'file.demo' for reading failed, error:", infile.message())
os.exit(1)
}
let line;
let num = 0
//Read file by using extraction operator(">>")
while (infile>>line != nil) {
num++
printf("%d %s\n", num, line)
}
}
```
### User Defined Operator
In monkey, you are free to define some operators, but you cannot
overwrite predefined operators.
> Note: Not all operators could be user defined.
Below is an example for showing how to write User Defined Operators:
```swift
//infix operator '=@' which accept two parameters.
fn =@(x, y) {
return x + y * y
}
//prefix operator '=^' which accept only one parameter.
fn =^(x) {
return -x
}
let pp = 10 =@ 5 // Use the '=@' user defined infix operator
printf("pp=%d\n", pp) // result: pp=35
let hh = =^10 // Use the '=^' prefix operator
printf("hh=%d\n", hh) // result: hh=-10
```
```swift
fn .^(x, y) {
arr = []
while x <= y {
arr += x
x += 2
}
return arr
}
let pp = 10.^20
printf("pp=%v\n", pp) // result: pp=[10, 12, 14, 16, 18, 20]
```
Below is a list of predefined operators and user defined operators:
| Predefined Operators</td>
| User Defined Operators</td>
</tr>
|
==
=~
=> |
=X |
++
+= |
+X |
--
-=
-> |
-X |
>=
<> |
>X |
<=
<< |
<X |
!=
!~ |
!X |
*=
** |
*X |
..
.. |
.X |
&=
&& |
&X |
|=
|| |
|X |
| ^= |
^X |
</table>
> In the table above, `X` could be `.=+-*/%&,|^~<,>},!?@#$`
### Integer
In monkey, integer is treated as an object, so you could call it's methods.
Please see below examples:
```swift
x = (-1).next()
println(x) //0
x = -1.next() //equals 'x = -(1.next())
println(x) //-2
x = (-1).prev()
println(x) //-2
x = -1.prev() //equals 'x = -(1.prev())
println(x) //0
x = [i for i in 10.upto(15)]
println(x) //[10, 11, 12, 13, 14, 15]
for i in 10.downto(5) {
print(i, "") //10 9 8 7 6 5
}
println()
if 10.isEven() {
println("10 is even")
}
if 9.isOdd() {
println("9 is odd")
}
```
### Float
In monkey, float is also treated as an object, so you could call it's methods.
Please see below examples:
```swift
f0 = 15.20
println(f0)
f1 = 15.20.ceil()
println(f1)
f2 = 15.20.floor()
println(f2)
```
### Decimal
In monkey, decimal is Arbitrary-precision fixed-point decimal numbers.
And the code mainly based on [decimal](https://github.com/shopspring/decimal).
Please see below examples:
```swift
d1 = decimal.fromString("123.45678901234567") //create decimal from string
d2 = decimal.fromFloat(3) //create decimal from float
//set decimal division precision.
//Note: this will affect all other code that follows
decimal.setDivisionPrecision(50)
fmt.println("123.45678901234567/3 = ", d1.div(d2)) //print d1/d2
fmt.println(d1.div(d2)) //same as above
fmt.println(decimal.fromString("123.456").trunc(2)) //truncate decimal
//convert string to decimal
d3=decimal("123.45678901234567")
fmt.println(d3)
fmt.println("123.45678901234567/3 = ", d3.div(d2))
```
### Array
In monkey, you could use [] to initialize an empty array:
```swift
emptyArr = []
emptyArr[3] = 3 //will auto expand the array
println(emptyArr)
```
You can create an array with the given size(or length) using below two ways:
```swift
//create an array with 10 elements initialized to nil.
//Note: this only support integer literal.
let arr = []10
println(arr)
//use the builtin 'newArray' method.
let anotherArr = newArray(len(arr))
println(anotherArr) //result: [nil, nil, nil, nil, nil, nil, nil, nil, nil, nil]
let arr1 = ["1","a5","5", "5b","4","cc", "7", "dd", "9"]
let arr2 = newArray(6, arr1, 10, 11, 12) //first parameter is the size
println(arr2) //result: ["1", "a5", "5", "5b", "4", "cc", "7", "dd", "9", 10, 11, 12]
let arr3 = newArray(20, arr1, 10, 11, 12)
println(arr3) //result : ["1", "a5", "5", "5b", "4", "cc", "7", "dd", "9", 10, 11, 12, nil, nil, nil, nil, nil, nil, nil, nil]
```
Array could contain any number of different data types.
Note: the last comma before the closing ']' is optional.
```swift
mixedArr = [1, 2.5, "Hello", ["Another", "Array"], {"Name": "HHF", "SEX": "Male"}]
```
You could use index to access array element.
```swift
println('mixedArr[2]={mixedArr[2]}')
println(["a", "b", "c", "d"][2])
```
Because array is an object, so you could use the object's method to operate on it.
```swift
if ([].empty()) {
println("array is empty")
}
emptyArr.push("Hello")
println(emptyArr)
//you could also use 'addition' to add an item to an array
emptyArr += 2
println(emptyArr)
//You could also use `<<(insertion operator)` to add item(s) to an array, the insertion operator support chain operation.
emptyArr << 2 << 3
println(emptyArr)
```
Array could be iterated using `for` loop
```swift
numArr = [1,3,5,2,4,6,7,8,9]
for item in numArr where item % 2 == 0 {
println(item)
}
let strArr = ["1","a5","5", "5b","4","cc", "7", "dd", "9"]
for item in strArr where /^\d+/.match(item) {
println(item)
}
for item in ["a", "b", "c", "d"] where $_ % 2 == 0 { //$_ is the index
printf("idx=%d, v=%s\n", $_, item)
}
```
You could also use the builtin `reverse` function to reverse array element:
```swift
let arr = [1,3,5,2,4,6,7,8,9]
println("Source Array =", arr)
revArr = reverse(arr)
println("Reverse Array =", revArr)
```
Array also support `array multiplication operator`(*):
```swift
let arr = [3,4] * 3
println(arr) // result: [3,4,3,4,3,4]
```
### String
In monkey, there are three types of `string`:
* Raw string
* Double quoted string(Could not contains newline)
* Single quoted string(Interpolated String)
Raw string literals are character sequences between back quotes, as in `foo`. Within the quotes, any character may appear except back quote.
See below for some examples:
```swift
normalStr = "Hello " + "world!"
println(normalStr)
println("123456"[2])
rawStr = `Welcome to
visit us!`
println(rawStr)
//when you use single quoted string, and want variable to be interpolated,
//you just put the variable into '{}'. see below:
str = "Hello world"
println('str={str}') //output: "Hello world"
str[6]="W"
println('str={str}') //output: "Hello World"
```
In monkey, strings are utf8-encoded, you could use utf-8 encoded name as a variable name.
```swift
三 = 3
五 = 5
println(三 + 五) //output : 8
```
strings are also object, so you could use some of the methods provided by `strings` module.
```swift
upperStr = "hello world".upper()
println(upperStr) //output : HELLO WORLD
```
string could also be iterated:
```swift
for idx, v in "abcd" {
printf("idx=%d, v=%s\n", idx, v)
}
for v in "Hello World" {
printf("idx=%d, v=%s\n", $_, v) //$_ is the index
}
```
You could concatenate an object to a string:
```swift
joinedStr = "Hello " + "World"
joinedStr += "!"
println(joinedStr)
```
You could also can use the builtin `reverse` function to reverse character of the string:
```swift
let str = "Hello world!"
println("Source Str =", str)
revStr = reverse(str)
println("Reverse str =", revStr)
```
If you hava a string, you want to convert it to number, you could add a "+" prefix before the string.
```swift
a = +"121314" // a is an int
println(a) // result: 121314
// Integer also support "0x"(hex), "0b"(binary), "0o"(octal) prefix
a = +"0x10" // a is an int
println(a) // result: 16
a = +"121314.6789" // a is a float
println(a) // result: 121314.6789
```
### Hash
In monkey, the builtin hash will keep the order of keys when they are added to the hash, just like python's orderedDict.
You could use {} to initialize an empty hash:
```swift
emptyHash = {}
emptyHash["key1"] = "value1"
println(emptyHash)
```
Hash's key could be string, int, boolean:
```swift
hashObj = {
12 : "twelve",
true : 1,
"Name" : "HHF"
}
println(hashObj)
```
Note: the last comma before the closing '}' is optional.
You could use '+' or '-' to add or remove an item from a hash:
```swift
hashObj += {"key1" : "value1"}
hashObj += {"key2" : "value2"}
hashObj += {5 : "five"}
hashObj -= "key2"
hashObj -= 5
println(hash)
```
In monkey, Hash is also an object, so you could use them to operate on hash object:
```swift
hashObj.push(15, "fifteen") //first parameter is the key, second is the value
hashObj.pop(15)
keys = hashObj.keys()
println(keys)
values = hashObj.values()
println(values)
```
You could also use the builtin `reverse` function to reverse hash's key and value:
```swift
let hs = {"key1": 12, "key2": "HHF", "key3": false}
println("Source Hash =", hs)
revHash = reverse(hs)
println("Reverse Hash =", revHash)
```
### Tuple
In monkey, `tuple` is just like array, but it could not be changed once it has been created.
Tuples are constructed using parenthesized list notation:
```swift
//Create an empty tuple
let t1 = tuple()
//Same as above.
let t2 = ()
// Create a one element tuple.
// Note: the trailing comma is necessary to distinguish it from the
// parenthesized expression (1).
// 1-tuples are seldom used.
let t3 = (1,)
//Create a two elements tuple
let t4 = (2,3)
```
Any object may be converted to a tuple by using the built-in `tuple` function.
```swift
let t = tuple("hello")
println(t) // result: ("hello")
```
Like arrays, tuples are indexed sequences, so they may be indexed and sliced.
The index expression tuple[i] returns the tuple element at index i, and the slice
expression tuple[i:j] returns a subsequence of a tuple.
```swift
let t = (1,2,3)[2]
print(t) // result:3
```
Tuples are iterable sequences, so they may be used as the operand of a for-loop,
a list comprehension, or various built-in functions.
```swift
//for-loop
for i in (1,2,3) {
println(i)
}
//tuple comprehension
let t1 = [x+1 for x in (2,4,6)]
println(t1) //result: [3, 5, 7]. Note: Result is array, not tuple
```
Unlike arrays, tuples cannot be modified. However, the mutable elements of a tuple may be modified.
```swift
arr1 = [1,2,3]
t = (0, arr1, 5, 6)
println(t) // result: (0, [1, 2, 3], 5, 6)
arr1.push(4)
println(t) //result: (0, [1, 2, 3, 4], 5, 6)
```
Tuples are hashable (assuming their elements are hashable), so they may be used as keys of a hash.
```swift
key1=(1,2,3)
key2=(2,3,4)
let ht = {key1 : 10, key2 : 20}
println(ht[key1]) // result: 10
println(ht[key2]) // result: 20
//Below is not supported(will issue a syntax error):
let ht = {(1,2,3) : 10, (2,3,4) : 20} //error!
println(ht[(1,2,3)]) //error!
println(ht[(2,3,4)]) //error!
```
Tuples may be concatenated using the + operator, it will create a new tuple.
```swift
let t = (1, 2) + (3, 4)
println(t) // result: (1, 2, 3, 4)
```
A tuple used in a Boolean context is considered true if it is non-empty.
```swift
let t = (1,)
if t {
println("t is not empty!")
} else {
println("t is empty!")
}
//result : "t is not empty!"
```
Tuple's json marshaling and unmarshaling will be treated as array:
```swift
let tupleJson = ("key1","key2")
let tupleStr = json.marshal(tupleJson)
//Result:[
// "key1",
// "key2",
// ]
println(json.indent(tupleStr, " "))
let tupleJson1 = json.unmarshal(tupleStr)
println(tupleJson1) //result: ["key1", "key2"]
```
Tuple plus an array will return an new array, not a tuple
```swift
t2 = (1,2,3) + [4,5,6]
println(t2) // result: [(1, 2, 3), 4, 5, 6]
```
You could also use the builtin `reverse` function to reverse tuples's elements:
```swift
let tp = (1,3,5,2,4,6,7,8,9)
println(tp) //result: (1, 3, 5, 2, 4, 6, 7, 8, 9)
revTuple = reverse(tp)
println(revTuple) //result: (9, 8, 7, 6, 4, 2, 5, 3, 1)
```
### class
Monkey has limited support for the oop concept, below is a list of features:
* inheritance and polymorphism
* operator overloading
* property(with getter or setter or both)
* static member/method/property
* indexer
* class category
* class annotations(limited support)
* constructor method and normal methods support default value and variadic parameters
The monkey parser could parse `public`, `private`, `protected`, but it has no effect in the evaluation phase.
That means monkey do not support access modifiers at present.
You use `class` keyword to declare a class and use `new class(xxx)` to create an instance of a `class`.
```swift
class Animal {
let name = ""
fn init(name) { //'init' is the constructor
//do somthing
}
}
```
In monkey, all class is inherited from the root class `object`.
`object` class include some common method like `toString()`, `instanceOf()`, `is_a()`, `classOf()`, `hashCode`.
Above code is same as:
```swift
class Animal : object {
let name = ""
fn init(name) { //'init' is the constructor
//do somthing
}
}
```
#### inheritance and polymorphism
You can inherit a class using `:`:
```swift
class Dog : Animal { //Dog inherits from Animal
}
```
In the child class, you can use the `parent` to access parent class's members or methods.
please see below for an example:
```swift
class Animal {
let Name;
fn MakeNoise()
{
println("generic noise")
}
fn ToString()
{
return "oooooooo"
}
}
class Cat : Animal {
fn init(name)
{
this.Name = name
}
fn MakeNoise()
{
println("Meow")
}
fn ToString()
{
return Name + " cat"
}
}
class Dog : Animal {
fn init(name)
{
this.Name = name
}
fn MakeNoise()
{
println("Woof!")
}
fn ToString()
{
return Name + " dog"
}
fn OnlyDogMethod()
{
println("secret dog only method")
}
}
cat = new Cat("pearl")
dog = new Dog("cole")
randomAnimal = new Animal()
animals = [cat, dog, randomAnimal]
for animal in animals
{
println("Animal name: " + animal.Name)
animal.MakeNoise()
println(animal.ToString())
if is_a(animal, "Dog") {
animal.OnlyDogMethod()
}
}
```
The result is:
```
Animal name: pearl
Meow
pearl cat
Animal name: cole
Woof!
cole dog
secret dog only method
Animal name: nil
generic noise
oooooooo
```
#### operator overloading
```swift
class Vector {
let x = 0;
let y = 0;
// constructor
fn init (a, b, c) {
if (!a) { a = 0;}
if (!b) {b = 0;}
x = a; y = b
}
fn +(v) { //overloading '+'
if (type(v) == "INTEGER" {
return new Vector(x + v, y + v);
} elseif v.is_a(Vector) {
return new Vector(x + v.x, y + v.y);
}
return nil;
}
fn String() {
return fmt.sprintf("(%v),(%v)", this.x, this.y);
}
}
fn Vectormain() {
v1 = new Vector(1,2);
v2 = new Vector(4,5);
// call + function in the vector object
v3 = v1 + v2 //same as 'v3 = v1.+(v2)'
// returns string "(5),(7)"
println(v3.String());
v4 = v1 + 10 //same as v4 = v1.+(10);
//returns string "(11),(12)"
println(v4.String());
}
Vectormain()
```
#### property(like c#)
```swift
class Date {
let month = 7; // Backing store
property Month
{
get { return month }
set {
if ((value > 0) && (value < 13))
{
month = value
} else {
println("BAD, month is invalid")
}
}
}
property Year; // same as 'property Year { get; set;}'
property Day { get; }
property OtherInfo1 { get; }
property OtherInfo2 { set; }
fn init(year, month, day) {
this.Year = year
this.Month = month
this.Day = day
}
fn getDateInfo() {
printf("Year:%v, Month:%v, Day:%v\n", this.Year, this.Month, this.Day) //note here, you need to use 'this.Property', not 'Property'
}
}
dateObj = new Date(2000, 5, 11)
//printf("Calling Date's getter, month=%d\n", dateObj.Month)
dateObj.getDateInfo()
println()
dateObj.Month = 10
printf("dateObj.Month=%d\n", dateObj.Month)
dateObj.Year = 2018
println()
dateObj.getDateInfo()
//Below code will raise an execution error! Because OtherInfo1 is a READONLY property.
//dateObj.OtherInfo1 = "Other Date Info"
//println(dateObj.OtherInfo1)
//Below code will raise an execution error! Because OtherInfo2 is a WRITEONLY property.
//dateObj.OtherInfo2 = "Other Date Info2"
//println(dateObj.OtherInfo2)
//Below code will raise an execution error! Because Day is a READONLY property.
//dateObj.Day = 18
```
#### indexer
Monkey has support for class `indexer`(like c#).
An indexer is a member that enables an object to be indexed in the same way as an array.
You declare an Indexer using `property this[parameter]`.
```swift
property this[index] {
get { xxx }
set { xxx }
}
```
Please see the example code:
```swift
class IndexedNames
{
let namelist = []
let size = 10
fn init()
{
let i = 0
for (i = 0; i < size; i++)
{
namelist[i] = "N. A."
}
}
fn getNameList() {
println(namelist)
}
property this[index]
{
get
{
let tmp;
if ( index >= 0 && index <= size - 1 )
{
tmp = namelist[index]
}
else
{
tmp = ""
}
return tmp
}
set
{
if ( index >= 0 && index <= size-1 )
{
namelist[index] = value
}
}
}
}
fn Main()
{
namesObj = new IndexedNames()
//Below code will call Indexer's setter function
namesObj[0] = "Zara"
namesObj[1] = "Riz"
namesObj[2] = "Nuha"
namesObj[3] = "Asif"
namesObj[4] = "Davinder"
namesObj[5] = "Sunil"
namesObj[6] = "Rubic"
namesObj.getNameList()
for (i = 0; i < namesObj.size; i++)
{
println(namesObj[i]) //Calling Indexer's getter function
}
}
Main()
```
#### static members/methods/properties
```swift
class Test
{
static let x = 0;
static let y = 5;
static fn Main()
{
println(Test.x);
println(Test.y);
Test.x = 99;
println(Test.x);
}
}
Test.Main()
```
Note:Non-static variable/method/property could access static variable/method/property.
On the other hand, static variable/method/property cannot access Non-static variable/method/property.
#### Class Category
Monkey also support class Category like objective-c(C# is called 'extension methods').
```swift
class Animal {
fn Walk() {
println("Animal Walk!")
}
}
//Class category like objective-c
class Animal (Run) { //Create an 'Run' category of Animal class.
fn Run() {
println("Animal Run!")
this.Walk() //can call Walk() method of Animal class.
}
}
animal = new Animal()
animal.Walk()
println()
animal.Run()
```
#### Annotations
Monkey also has very simple annotation support like java:
* Only mehotd and property of class can have annotations(not class itself, or other simple functions)
* In the body of `Annotation` class, only support property, do not support methods.
* When use annotations, you must create an object.
You could use `class @annotationName {}` to declare an annotation class.
Monkey also include some builtin annotations:
* @Override annotation(just like java's @Override).
* @NotNull
* @NotEmpty
Please see below example:
```swift
//Declare annotation class
//Note: In the body, you must use property, not method.
class @MinMaxValidator {
property MinLength
property MaxLength default 10 //Same as 'property MaxLength = 10'
}
//This is a marker annotation
class @NoSpaceValidator {}
class @DepartmentValidator {
property Department
}
//The 'Request' class
class Request {
@MinMaxValidator(MinLength=1)
property FirstName; // getter and setter is implicit
@NoSpaceValidator
property LastName;
@DepartmentValidator(Department=["Department of Education", "Department of Labors", "Department of Justice"])
property Dept;
}
//This class is responsible for processing the annotation.
class RequestHandler {
static fn handle(o) {
props = o.getProperties()
for p in props {
annos = p.getAnnotations()
for anno in annos {
if anno.instanceOf(MinMaxValidator) {
//p.value is the property real value.
if len(p.value) > anno.MaxLength || len(p.value) < anno.MinLength {
printf("Property '%s' is not valid!\n", p.name)
}
} elseif anno.instanceOf(NoSpaceValidator) {
for c in p.value {
if c == " " || c == "\t" {
printf("Property '%s' is not valid!\n", p.name)
break
}
}
} elseif anno.instanceOf(DepartmentValidator) {
found = false
for d in anno.Department {
if p.value == d {
found = true
}
}
if !found {
printf("Property '%s' is not valid!\n", p.name)
}
}
}
}
}
}
class RequestMain {
static fn main() {
request = new Request()
request.FirstName = "Haifeng123456789"
request.LastName = "Huang "
request.Dept = "Department of Justice"
RequestHandler.handle(request)
}
}
RequestMain.main()
```
Below is the result:
```
Property 'FirstName' is not valid!
Property 'LastName' is not valid!
```
### Standard input/output/error
There are three predefined object for representing standard input, standard output, standard error.
They are `stdin`, `stdout`, `stderr`.
```swift
stdout.writeLine("Hello world")
//same as above
fmt.fprintf(stdout, "Hello world\n")
print("Please type your name:")
name = stdin.read(1024) //read up to 1024 bytes from stdin
println("Your name is " + name)
```
You can also using Insertion operator (`<<`) and Extraction operator(`>>`) just like c++ to operate stdin/stdout/stderr.
```swift
// Output to stdout by using insertion operator("<<")
// 'endl' is a predefined object, which is "\n".
stdout << "hello " << "world!" << " How are you?" << endl;
// Read from stdin by using extraction operator(">>")
let name;
stdout << "Your name please: ";
stdin >> name;
printf("Welcome, name=%v\n", name)
```
Insertion operator (`<<`) and Extraction operator(`>>`) can also be used for operating file object。
```swift
//Read file by using extraction operator(">>")
infile = newFile("./file.demo", "r")
if (infile == nil) {
println("opening 'file.demo' for reading failed, error:", infile.message())
os.exit(1)
}
let line;
let num = 0
while ( infile>>line != nil) {
num++
printf("%d %s\n", num, line)
}
infile.close()
//Writing to file by using inserttion operator("<<")
outfile = newFile("./outfile.demo", "w")
if (outfile == nil) {
println("opening 'outfile.demo' for writing failed, error:", outfile.message())
os.exit(1)
}
outfile << "Hello" << endl
outfile << "world" << endl
outfile.close()
```
### Error Handling of standard library
When a standard library function returns `nil` or `false`, you can use the return value's message() function for the error message:
```swift
file = newFile(filename, "r")
if (file == nil) {
println("opening ", filename, "for reading failed, error:", file.message())
}
//do something with the file
//close the file
file.close()
let ret = http.listenAndServe("127.0.0.1:9090")
if (ret == false) {
println("listenAndServe failed, error:", ret.message())
}
```
Maybe you are curious about why `nil` or `false` have message() function? Because in monkey, `nil` and `false`
both are objects, so they have method to operate on it.
### About `defer` keyword
A defer statement defers the execution of a function until the surrounding function returns.
The deferred call's arguments are evaluated immediately, but the function call is not executed until the surrounding function returns.
```swift
let add = fn(x,y){
defer println("I'm defer1")
println("I'm in add")
defer println("I'm defer2")
return x + y
}
println(add(2,2))
```
The result is as below:
```sh
I'm in add
I'm defer2
I'm defer1
4
```
```swift
file = newFile(filename, "r")
if (file == nil) {
println("opening ", filename, "for reading failed, error:", file.message())
return false
}
defer file.close()
//do other file related stuff, and not need to worry about the file close.
//when any file operation error occurs, it will close the file before it returns.
```
### Concatenation of different types
In monkey, you could concatenate of different types. See below for examples:
```swift
// Number plus assignment
num = 10
num += 10 + 15.6
num += 20
println(num)
// String plus assignment
str = "Hello "
str += "world! "
str += [1, 2, 3]
println(str)
// Array plus assignment
arr = []
arr += 1
arr += 10.5
arr += [1, 2, 3]
arr += {"key": "value"}
println(arr)
// Array compare
arr1 = [1, 10.5, [1, 2, 3], {"key" : "value"}]
println(arr1)
if arr == arr1 { //support ARRAY compare
println("arr1 = arr")
} else {
println("arr1 != arr")
}
// Hash assignment("+=", "-=")
hash = {}
hash += {"key1" : "value1"}
hash += {"key2" : "value2"}
hash += {5 : "five"}
println(hash)
hash -= "key2"
hash -= 5
println(hash)
```
### Comprehensions
Monkey support list(array,string, range, tuple) comprehensions.
list comprehension will return an array.
please see following examples:
```swift
//array comprehension
x = [[word.upper(), word.lower(), word.title()] for word in ["hello", "world", "good", "morning"]]
println(x) //result: [["HELLO", "hello", "Hello"], ["WORLD", "world", "World"], ["GOOD", "good", "Good"], ["MORNING", "morning", "Morning"]]
//string comprehension (here string is treated like an array)
y = [ c.upper() for c in "huanghaifeng" where $_ % 2 != 0] //$_ is the index
println(y) //result: ["U", "N", "H", "I", "E", "G"]
//range comprehension
w = [i + 1 for i in 2..10]
println(w) //result: [2, 3, 4, 5, 6, 7, 8, 9, 10, 11]
//tuple comprehension
v = [x+1 for x in (12,34,56)]
println(v) //result: [13, 35, 57]
//hash comprehension
z = [v * 10 for k,v in {"key1": 10, "key2": 20, "key3": 30}]
println(z) //result: [100, 200, 300]
```
Monkey also support hash comprehension.
hash comprehension will return a hash.
please see following examples:
```swift
//hash comprehension (from hash)
z1 = { v:k for k,v in {"key1": 10, "key2": 20, "key3": 30}} //reverse key-value pair
println(z1) // result: {10 : "key1", 20 : "key2", 30 : "key3"}. Order may differ
//hash comprehension (from array)
z2 = {x:x**2 for x in [1,2,3]}
println(z2) // result: {1 : 1, 2 : 4, 3 : 9}. Order may differ
//hash comprehension (from .. range)
z3 = {x:x**2 for x in 5..7}
println(z3) // result: {5 : 25, 6 : 36, 7 : 49}. Order may differ
//hash comprehension (from string)
z4 = {x:x.upper() for x in "hi"}
println(z4) // result: {"h" : "H", "i" : "I"}. Order may differ
//hash comprehension (from tuple)
z5 = {x+1:x+2 for x in (1,2,3)}
println(z5) // result: {4 : 5, 2 : 3, 3 : 4}. Order may differ
```
### grep and map
The `grep` and `map` operators are just like perl's `grep` and `map`.
The grep operator takes a list of values and a "testing expression." For each item in the list of values,
the item is placed temporarily into the $_ variable, and the testing expression is evaluated. If the
expression results in a true value, the item is considered selected.
The map operator has a very similar syntax to the grep operator and shares a lot of the same operational steps.
For example, items from a list of values are temporarily placed into $_ one at a time. However,
the testing expression becomes a mapping expression.
```swift
let sourceArr = [2,4,6,8,10,12]
let m = grep $_ > 5, sourceArr
println('m is {m}')
let cp = map $_ * 2 , sourceArr
println('cp is {cp}')
//a little bit more complex example
let fields = {
"animal" : "dog",
"building" : "house",
"colour" : "red",
"fruit" : "apple"
}
let pattern = `animal|fruit`
// =~(match), !~(unmatch)
let values = map { fields[$_] } grep { $_ =~ pattern } fields.keys()
println(values)
```
### Function
Function in monkey is a first-class object. This means the language supports passing functions as arguments to
other functions, returning them as the values from other functions, and assigning them to variables or storing
them in data structures.
Function also could have default parameters and variadic parameters.
```swift
//define a function
let add = fn() { [5,6] }
let n = [1, 2] + [3, 4] + add()
println(n)
let complex = {
"add" : fn(x, y) { return fn(z) {x + y + z } }, //function with closure
"sub" : fn(x, y) { x - y },
"other" : [1,2,3,4]
}
println(complex["add"](1, 2)(3))
println(complex["sub"](10, 2))
println(complex["other"][2])
let warr = [1+1, 3, fn(x) { x + 1}(2),"abc","def"]
println(warr)
println("\nfor i in 5..1 where i > 2 :")
for i in fn(x){ x+1 }(4)..fn(x){ x+1 }(0) where i > 2 {
if (i == 3) { continue }
println('i={i}')
}
// default parameter and variadic parameters
add = fn (x, y=5, z=7, args...) {
w = x + y + z
for i in args {
w += i
}
return w
}
w = add(2,3,4,5,6,7)
println(w)
```
You could also declare named function like below:
```swift
fn sub(x,y=2) {
return x - y
}
println(sub(10)) //output : 8
```
You could also create a function using the `fat arrow` syntax:
```swift
let x = () => 5 + 5
println(x()) //result: 10
let y = (x) => x * 5
println(y(2)) //result: 10
let z = (x,y) => x * y + 5
println(z(3,4)) //result :17
let add = fn (x, factor) {
x + factor(x)
}
result = add(5, (x) => x * 2)
println(result) //result : 15
```
If the function has no parameter, then you could omit the parentheses. e.g.
```swift
println("hhf".upper) //result: "HHF"
//Same as above
println("hhf".upper())
```
Before ver5.0, Monkey do not support multiple return values, But there are many ways to do it.
Below suggest a way of doing it:
```swift
fn div(x, y) {
if y == 0 {
return [nil, "y could not be zero"]
}
return [x/y, ""]
}
ret = div(10,5)
if ret[1] != "" {
println(ret[1])
} else {
println(ret[0])
}
```
Starting from ver5.0, Monkey support multiple return values using 'let'.
The returned values are wrapped as a tuple.
```swift
fn testReturn(a, b, c, d=40) {
return a, b, c, d
}
let (x, y, c, d) = testReturn(10, 20, 30)
// let x, y, c, d = testReturn(10, 20, 30) same as above
printf("x=%v, y=%v, c=%v, d=%v\n", x, y, c, d)
//Result: x=10, y=20, c=30, d=40
```
Note:You must use `let` to support multiple return values, below statement will issue a compile error.
```swift
(x, y, c, d) = testReturn(10, 20, 30) // no 'let', compile error
x, y, c, d = testReturn(10, 20, 30) // no 'let', compile error
```
### Pipe Operator
The pipe operator, inspired by [Elixir](https://elixir-lang.org/).
And thanks for the project [Aria](https://github.com/fadion/aria), I got the idea and some code from this project.
See below for examples:
```swift
# Test pipe operator(|>)
x = ["hello", "world"] |> strings.join(" ") |> strings.upper() |> strings.lower() |> strings.title()
printf("x=<%s>\n", x)
let add = fn(x,y) { return x + y }
let pow = fn(x) { return x ** 2}
let subtract = fn(x) { return x - 1}
let mm = add(1,2) |> pow() |> subtract()
printf("mm=%d\n", mm)
"Hello %s!\n" |> fmt.printf("world")
```
### Spawn and channel
You can use `spawn` to create a new thread, and `chan` to communicate with the thread.
```swift
let aChan = chan()
spawn fn() {
let message = aChan.recv()
println('channel received message=<{message}>')
}()
//send message to thread
aChan.send("Hello Channel!")
```
You could use channel and spawn togeter to support lazy evaluation:
```swift
// XRange is an iterator over all the numbers from 0 to the limit.
fn XRange(limit) {
ch = chan()
spawn fn() {
//for (i = 0; i <= limit; i++) // Warning: Never use this kind of for loop, or else you will get weird results.
for i in 0..limit {
ch.send(i)
}
// Ensure that at the end of the loop we close the channel!
ch.close()
}()
return ch
}
for i in XRange(10) {
fmt.println(i)
}
```
## Use `go` language modules
Monkey has experimental support for working with `go` modules.
If you need to use `go`s language package fucntion, you first need to use `RegisterFunctions' or `RegisterVars` to
register `go` language functions or types into monkey language.
Below is an example of `main.go`(extracted):
```swift
// Because in monkey we already have built in module `fmt`, here we use `gfmt` for package name.
eval.RegisterFunctions("gfmt", []interface{}{
fmt.Errorf,
fmt.Println, fmt.Print, fmt.Printf,
fmt.Fprint, fmt.Fprint, fmt.Fprintln, fmt.Fscan, fmt.Fscanf, fmt.Fscanln,
fmt.Scan, fmt.Scanf, fmt.Scanln,
fmt.Sscan, fmt.Sscanf, fmt.Sscanln,
fmt.Sprint, fmt.Sprintf, fmt.Sprintln,
})
eval.RegisterFunctions("io/ioutil", []interface{}{
ioutil.WriteFile, ioutil.ReadFile, ioutil.TempDir, ioutil.TempFile,
ioutil.ReadAll, ioutil.ReadDir, ioutil.NopCloser,
})
eval.Eval(program, scope)
```
Now, in your monkey file, you could use it like below:
```swift
gfmt.Printf("Hello %s!\n", "go function");
//Note Here: we use 'io_ioutil', not 'io/ioutil'.
let files, err = io_ioutil.ReadDir(".")
if err != nil {
gfmt.Println(err)
}
for file in files {
if file.Name() == ".git" {
continue
}
gfmt.Printf("Name=%s, Size=%d\n", file.Name(), file.Size())
}
```
For more detailed examples, please see `goObj.my`.
## Standard module introduction
In monkey, there are some standard modules provided for you. e.g. json, sql, sort, fmt, os, logger, time, flag, net, http, etc...
This is a brief introduction of some of the monkey standard modules, don't expect it to be thorough.
If you are curious, please see the source code.
#### fmt module
```swift
let i, f, b, s, aArr, aHash = 108, 25.383, true, "Hello, world",
[1, 2, 3, 4, "a", "b"],
{ "key1" : 1, "key2" : 2, "key3" : "abc"}
// Use '%v (value)' to print variable value, '%_' to print the variable's type
fmt.printf("i=[%05d, %X], b=[%t], f=[%.5f], s=[%-15s], aArr=%v, aHash=%v\n", i, i, b, f, s, aArr, aHash)
fmt.printf("i=[%_], b=[%t], f=[%f], aArr=%_, aHash=%_, s=[%s] \n", i, b, f, aArr, aHash, s)
sp = fmt.sprintf("i=[%05d, %X], b=[%t], f=[%.5f], s=[%-15s]\n", i, i, b, f, s)
fmt.printf("sp=%s", sp)
fmt.fprintf(stdout, "Hello %s\n", "world")
```
#### time module
```swift
t1 = newTime()
format = t1.strftime("%F %R")
println(t1.toStr(format))
Epoch = t1.toEpoch()
println(Epoch)
t2 = t1.fromEpoch(Epoch)
println(t2.toStr(format))
```
#### logger module
```swift
#Log to stdout
log = newLogger(stdout, "LOGGER-", logger.LSTDFLAGS | logger.LMICROSECONDS)
log.printf("Hello, %s\n", "logger")
fmt.printf("Logger: flags =<%d>, prefix=<%s>\n", log.flags(), log.prefix())
#Log to file
file = newFile("./logger.log", "a+")
log.setOutput(file)
for i in 1..5 {
log.printf("This is <%d>\n", i)
}
file.close() //do not forget to close the file
```
#### flag module(for handling of command line options)
```swift
let verV = flag.bool("version", false, "0.1")
let ageV = flag.int("age", 40, "an int")
let heightV = flag.float("height", 120.5, "a float")
let nameV = flag.string("name", "HuangHaiFeng", "a string")
let hobbiesV = flag.string("hobbies", "1,2,3", "a comma-delimited string")
flag.parse()
println("verV = ", verV)
println("ageV = ", ageV)
println("heightV = ", heightV)
println("nameV = ", nameV)
println("hobbies = ", hobbiesV.split(","))
if (flag.isSet("age")) {
println("age is set")
} else {
println("age is not set")
}
```
#### json module(for json marshal & unmarshal)
```swift
let hsJson = {"key1" : 10,
"key2" : "Hello Json %s %s Module",
"key3" : 15.8912,
"key4" : [1,2,3.5, "Hello"],
"key5" : true,
"key6" : {"subkey1": 12, "subkey2": "Json"},
"key7" : fn(x,y){x+y}(1,2)
}
let hashStr = json.marshal(hsJson) //same as `json.toJson(hsJson)`
println(json.indent(hashStr, " "))
let hsJson1 = json.unmarshal(hashStr)
println(hsJson1)
let arrJson = [1,2.3,"HHF",[],{ "key" : 10, "key1" : 11}]
let arrStr = json.marshal(arrJson)
println(json.indent(arrStr))
let arr1Json = json.unmarshal(arrStr) //same as `json.fromJson(arrStr)`
println(arr1Json)
```
#### net module
```swift
//A simple tcp client
let conn = dialTCP("tcp", "127.0.0.1:9090")
if (conn == nil) {
println("dailTCP failed, error:", conn.message())
os.exit(1)
}
let n = conn.write("Hello server, I'm client")
if (n == nil) {
println("conn write failed, error:", n.message())
os.exit(1)
}
let ret = conn.close()
if (ret == false) {
println("Server close failed, error:", ret.message())
}
//A simple tcp server
let ln = listenTCP("tcp", ":9090")
for {
let conn = ln.acceptTCP()
if (conn == nil) {
println(conn.message())
} else {
printf("Accepted client, Address=%s\n", conn.addr())
}
spawn fn(conn) { //spawn a thread to handle the connection
println(conn.read())
}(conn)
} //end for
let ret = ln.close()
if (ret == false) {
println("Server close failed, error:", ret.message())
}
```
#### linq module
In monkey, the `linq` module support seven types of object:
* File object (create using `newFile` builtin function)
* Csv reader object (created using `newCsvReader` builtin function)
* String object
* Array object
* Tuple object
* Hash object
* Channel object (created using `chan` builtin function)
```swift
let mm = [1,2,3,4,5,6,7,8,9,10]
println('before mm={mm}')
result = linq.from(mm).where(fn(x) {
x % 2 == 0
}).select(fn(x) {
x = x + 2
}).toSlice()
println('after result={result}')
result = linq.from(mm).where(fn(x) {
x % 2 == 0
}).select(fn(x) {
x = x + 2
}).last()
println('after result={result}')
let sortArr = [1,2,3,4,5,6,7,8,9,10]
result = linq.from(sortArr).sort(fn(x,y){
return x > y
})
println('[1,2,3,4,5,6,7,8,9,10] sort(x>y)={result}')
result = linq.from(sortArr).sort(fn(x,y){
return x < y
})
println('[1,2,3,4,5,6,7,8,9,10] sort(x<y)={result}')
thenByDescendingArr = [
{"Owner" : "Google", "Name" : "Chrome"},
{"Owner" : "Microsoft", "Name" : "Windows"},
{"Owner" : "Google", "Name" : "GMail"},
{"Owner" : "Microsoft", "Name" : "VisualStudio"},
{"Owner" : "Google", "Name" : "GMail"},
{"Owner" : "Microsoft", "Name" : "XBox"},
{"Owner" : "Google", "Name" : "GMail"},
{"Owner" : "Google", "Name" : "AppEngine"},
{"Owner" : "Intel", "Name" : "ParallelStudio"},
{"Owner" : "Intel", "Name" : "VTune"},
{"Owner" : "Microsoft", "Name" : "Office"},
{"Owner" : "Intel", "Name" : "Edison"},
{"Owner" : "Google", "Name" : "GMail"},
{"Owner" : "Microsoft", "Name" : "PowerShell"},
{"Owner" : "Google", "Name" : "GMail"},
{"Owner" : "Google", "Name" : "GDrive"}
]
result = linq.from(thenByDescendingArr).orderBy(fn(x) {
return x["Owner"]
}).thenByDescending(fn(x){
return x["Name"]
}).toOrderedSlice() //Note: You need to use toOrderedSlice
//use json.indent() for formatting the output
let thenByDescendingArrStr = json.marshal(result)
println(json.indent(thenByDescendingArrStr, " "))
//test 'selectManyByIndexed'
println()
let selectManyByIndexedArr1 = [[1, 2, 3], [4, 5, 6, 7]]
result = linq.from(selectManyByIndexedArr1).selectManyByIndexed(
fn(idx, x){
if idx == 0 { return linq.from([10, 20, 30]) }
return linq.from(x)
}, fn(x,y){
return x + 1
})
println('[[1, 2, 3], [4, 5, 6, 7]] selectManyByIndexed() = {result}')
let selectManyByIndexedArr2 = ["st", "ng"]
result = linq.from(selectManyByIndexedArr2).selectManyByIndexed(
fn(idx,x){
if idx == 0 { return linq.from(x + "r") }
return linq.from("i" + x)
},fn(x,y){
return x + "_"
})
println('["st", "ng"] selectManyByIndexed() = {result}')
```
#### Linq for file
Now, monkey has a powerful `linq for file` support. it can be used to operate
files a little bit like awk. See below for example:
```swift
//test: linq for "file"
file = newFile("./examples/linqSample.csv", "r") //open linqSample.csv file for reading
result = linq.from(file,",",fn(line){ //the second parameter is field separator, the third is a selector function
if line.trim().hasPrefix("#") { //if line start '#'
return true // return 'true' means we ignore this line
} else {
return false
}
}).where(fn(fields) {
//The 'fields' is an array of hashes, like below:
// fields = [
// {"line": LineNo1, "nf": line1's number of fields, 0: line1, 1: field1, 2: field2, ...},
// {"line": LineNo2, "nf": line2's number of fields, 0: line2, 1: field1, 2: field2, ...}
// ]
int(fields[1]) > 300000 //only 1st Field's Value > 300000
}).sort(fn(field1,field2){
return int(field1[1]) > int(field2[1]) //sort with first field(descending)
}).select(fn(fields) {
fields[5] //only output the fifth field
})
println(result)
file.close() //do not forget to close the file
//another test: linq for "file"
file = newFile("./examples/linqSample.csv", "r") //open linqSample.csv file for reading
result = linq.from(file,",",fn(line){ //the second parameter is field separator, the third is a selector function
if line.trim().hasPrefix("#") { //if line start '#'
return true //return 'true' means we ignore this line
} else {
return false
}
}).where(fn(fields) {
int(fields[1]) > 300000 //only 1st Field's Value > 300000
}).sort(fn(field1,field2){
return int(field1[1]) > int(field2[1]) //sort with first field(descending)
}).selectMany(fn(fields) {
row = [[fields[0]]] //fields[0] is the whole line, we need two "[]"s, otherwise selectMany() will flatten the output.
linq.from(row) //output the whole records
})
println(result)
file.close() //do not forget to close the file
//test: linq for "csv"
r = newCsvReader("./examples/test.csv") //open test.csv file for reading
r.setOptions({"Comma": ";", "Comment": "#"})
result = linq.from(r).where(fn(x) {
//The 'x' is an array of hashes, like below:
// x = [
// {"nf" : line1's number of fields, 1: field1, 2: field2, ...},
// {"nf" : line2's number of fields, 1: field1, 2: field2, ...}
// ]
x[2] == "Pike"//only 2nd Field = "Pike"
}).sort(fn(x,y){
return len(x[1]) > len(y[1]) //sort with length of first field
})
println(result)
r.close() //do not forget to close the reader
```
#### csv module
```swift
//test csv reader
let r = newCsvReader("./examples/test.csv")
if r == nil {
printf("newCsv returns err, message:%s\n", r.message())
}
r.setOptions({"Comma": ";", "Comment": "#"})
ra = r.readAll()
if (ra == nil) {
printf("readAll returns err, message:%s\n", ra.message())
}
for line in ra {
println(line)
for record in line {
println(" ", record)
}
}
r.close() //do not forget to close the reader
//test csv writer
let ofile = newFile("./examples/demo.csv", "a+")
let w = newCsvWriter(ofile)
w.setOptions({"Comma": " "})
w.write(["1", "2", "3"])
w.writeAll([["4", "5", "6"],["7", "8", "9"],["10", "11", "12"]])
w.flush()
ofile.close() //do not forget to close the file
```
#### template module
The `template` module contains 'text' and 'html' template handling.
Use `newText(...)` or `parseTextFiles(...)` to create a new 'text' template.
Use `newHtml(...)` or `parseHtmlFiles(...)` to create a new 'html' template.
```swift
arr = [
{ "key" : "key1", "value" : "value1" },
{ "key" : "key2", "value" : "value2" },
{ "key" : "key3", "value" : "value3" }
]
//use parseTextFiles(), write to a string
template.parseTextFiles("./examples/looping.tmpl").execute(resultValue, arr)
println('{resultValue}')
//use parseTextFiles(), write to a file
file = newFile("./examples/outTemplate.log", "a+")
template.parseTextFiles("./examples/looping.tmpl").execute(file, arr)
file.close() //do not to forget to close the file
//use parse()
//Note here: we need to use " and " to remove the newline from the output
template.newText("array").parse(`Looping
key=, value=
`).execute(resultValue, arr)
println('{resultValue}')
```
#### sql module
The `sql` module provides a lower abstraction layer for working with database.
It should correctly handle database null values, though not throughly tested.
For testing `sql` module, you need to do following:
1. Download sql driver source.
2. Include the package in 'sql.go' like below:
```go
_ "github.com/mattn/go-sqlite3"
```
3. Recompile monkey source.
Below is a complete source of the `examples/db.my`:
```swift
let dbOp = fn() {
os.remove("./foo.db") //delete `foo.db` file
let db = dbOpen("sqlite3", "./foo.db")
if (db == nil) {
println("DB open failed, error:", db.message())
return false
}
defer db.close()
let sqlStmt = `create table foo (id integer not null primary key, name text);delete from foo;`
let exec_ret = db.exec(sqlStmt)
if (exec_ret == nil) {
println("DB exec failed! error:", exec_ret.message())
return false
}
let tx = db.begin()
if (tx == nil) {
println("db.Begin failed!, error:", tx.message())
return false
}
let stmt = tx.prepare(`insert into foo(id, name) values(?, ?)`)
if (stmt == nil) {
println("tx.Prepare failed!, error:", stmt.message())
return false
}
defer stmt.close()
let i = 0
for (i = 0; i < 105; i++) {
let name = "您好" + i
if (i>100) {
//insert `null` value. There are seven predefined values:INT_NULL,UINT_NULL,FLOAT_NULL,STRING_NULL,BOOL_NULL,TIME_NULL, DECIMAL_NULL.
let rs = stmt.exec(i, sql.STRING_NULL)
} else {
let rs = stmt.exec(i, name)
}
if (rs == nil) {
println("statement exec failed, error:", rs.message())
return false
}
} //end for
tx.commit()
let id, name = 0, ""
let rows = db.query("select id, name from foo")
if (rows == nil) {
println("db queue failed, error:", rows.message())
return false
}
defer rows.close()
while (rows.next()) {
rows.scan(id, name)
if (name.valid()) { //check if it's `null`
println(id, "|", name)
} else {
println(id, "|", "null")
}
}
return true
}
let ret = dbOp()
if (ret == nil) {
os.exit(1)
}
os.exit()
```
## About regular expression
In monkey, regard to regular expression, you could use:
* Regular expression literal
* 'regexp' module
* =~ and !~ operators(like perl's)
```swift
//Use regular expression literal( /pattern/.match(str) )
let regex = /\d+\t/.match("abc 123 mnj")
if (regex) { println("regex matched using regular expression literal") }
//Use 'regexp' module
if regexp.compile(`\d+\t`).match("abc 123 mnj") {
println("regex matched using 'regexp' module")
}
//Use '=~'(str =~ pattern)
if "abc 123 mnj" =~ `\d+\t` {
println("regex matched using '=~'")
}else {
println("regex not matched using '=~'")
}
```
```sh
Note: For detailed explanation of 'Regular Expression' pattern matching, you could see golang's regexp module for reference.
```
## Useful Utilities
Included has some useful utilities like `formatter` and `highlighter`.
The formatter utility can format the monkey language.
The highlighter utility can highlight the monkey language to console or html.
You could also combine the two utilities:
```sh
./fmt xx.my | ./highlight //output to console(console highlight not support windows)
```
## Document generator
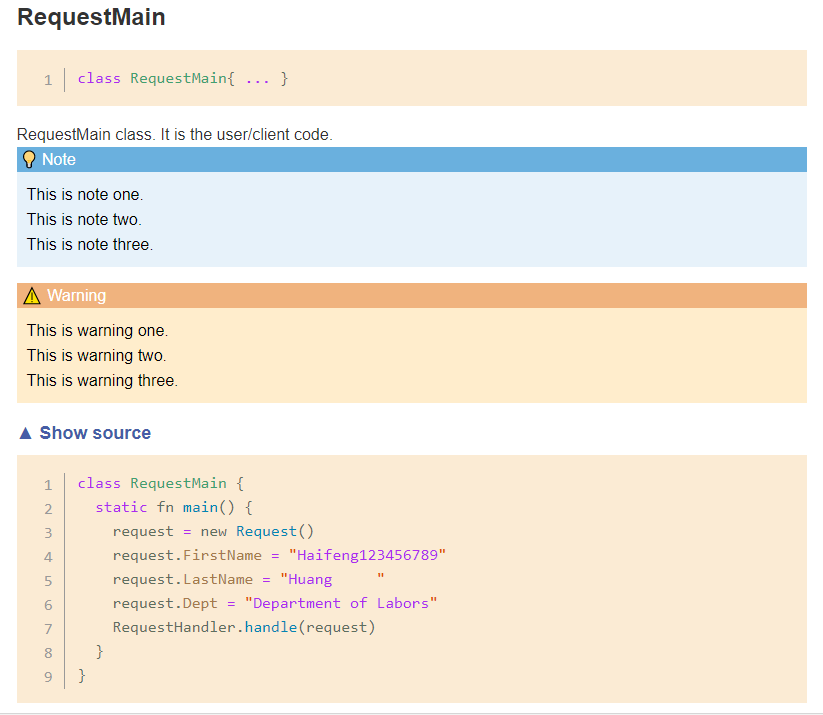
Included also has a tool(`mdoc`) for generating documentation in markdown format or html format
The tool only support below statement for document generator:
* let statement
* enum statement
* function statement
* class statement
* let statement
* function statement
* property statement
```sh
//generate markdown file, the generated file is named 'doc.md'
./mdoc examples/doc.my
//generate html file, the generated file is named 'doc.html'
./mdoc -html examples/doc.my
//generate html file, also generate source code of classes and functions. the generated file is named 'doc.html'
./mdoc -html -showsource examples/doc.my
//Use the some builtin css types for styling the generated html
// 0 - GitHub
// 1 - Zenburn
// 2 - Lake
// 3 - Sea Side
// 4 - Kimbie Light
// 5 - Light Blue
// 6 - Atom Dark
// 7 - Forgotten Light
./mdoc -html -showsource -css 1 examples/doc.my
//Using external css file for styling the generated html file.
//The '-cssfile' option has higher priority than the '-css' option.
//If the supplied css file does not exists, then the '-css' option will be used.
./mdoc -html -showsource -css 1 -cssfile ./examples/github-markdown.css examples/doc.my
//processing all the '.my' files in examples directory, generate html.
./mdoc -html examples
```
The generating of HTML document is base on github REST API,so you must have network connection to make it work.
You may also need to set proxy if you behind a firewall(Environ variable:HTTP_PROXY).
Look at below to see how documentation generated by mdoc looks like.
* [markdown.md](/monkey/examples/markdown.html)
* [markdown.html](/monkey/examples/markdown.html)
Because github can not render html directly, you could use(http://htmlpreview.github.io/) to review the generated html.
## Syntax Highlight
Currently there are below kinds of syntax highlight for editors:
1. vim
[vim](misc/vim)
2. emeditor
[emeditor](misc/emeditor)
3. notepad++
[notepad++](misc/notepad%2B%2B)
4. Visual Studio Code
[VSC](misc/vscode)
5. Sublime Text 3
[Sublime Text 3](misc/SublimeText3)
## Future Plans
There are some other things i plan to do:
* Improve the Standard Library with more functions.
* Write more tests!
* Improve this document with more explanation of the language.
* Rewrite the demo program for better understanding of the language.
* Rewrite the 'include' module logic.
* ~~Add support for if-elseif-else expression~~.
## License
MIT